


Batch resizing
cam2pc allows you to resize images in batch. This comes very handy if you want to publish your images on the web and need to resize them so that people can download them on a standard dial-up connection.
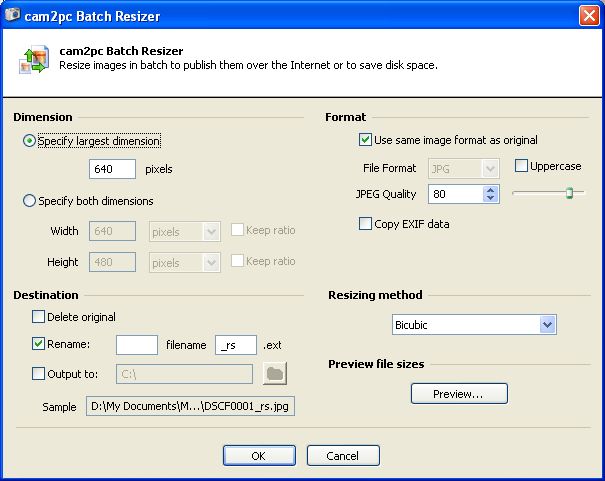
You can resize images in many different ways. One thing you might always want to do is to keep the aspect ratio of your images. So you will either specify a target width or a target height and check the "Keep ratio" option for the other dimension.
For instance you might want that all your pictures are 640 pixel wide so you specify 640 pixels in the Width text field and you check the "Keep ratio" option on the Height line.
The problem in doing this is that landscape images will usually be resized to something like 640x480 as they are wider than tall. But for portrait shots it is the contrary: they are taller than wide and as we keep the aspect ratio they will be resized to 640x968 which is much bigger than what we planed.
In that case you can resize images along the largest dimension. If you specify 640 for the largest dimension, landscape images will be resized to 640x480 and portrait ones to 480x640. The largest dimension is always set to 640 thus all our images do have the same size in surface.
If you do not check "Rename" or "Output to", your images will be replaced by the resized ones. To avoid that, you can:
- Rename the images by adding a prefix and/or a suffix to the original image (e.g. rename image01.jpg to image01_small.jpg)
- Output the resized images to a different directory. Click on the folder button to browse your computer for a destination folder.
Of course, you can rename and output to a different directory at the same time.
In most cases you should leave the Resizing method to Bicubic. The Fast method will produce bad quality images but will be very fast. The Bilinear option will produce in-between image quality in a very short time too. If you resize your images to very small thumbnails (less than 100 pixels) then you can switch to Lanczos or Mitchell which will produce higher quality results but are much slower.
The output format is set by default to the same at the input images. You can force a format conversion at the same time of the resizing.
The last option allows you preserve EXIF metadata when doing the resizing. Keep in mind that only TIFF and JPEG file formats are able to store EXIF metadata.
Finally the preview file sizes button will allow you to check the final size of each image. This comes in handy if you want to publish the pictures on the web and make sure they will not be too heavy to download for your visitors.