


Enhancing images
cam2pc also allows you to perform basic retouching of your pictures. This will allow you to compensate for common issues in pictures taken with digital photography: under or over exposure, red eyes, bad framing... Simply select an image in the browser and choose Enhance Image in the Image menu or in the contextual menu. The following window appears:
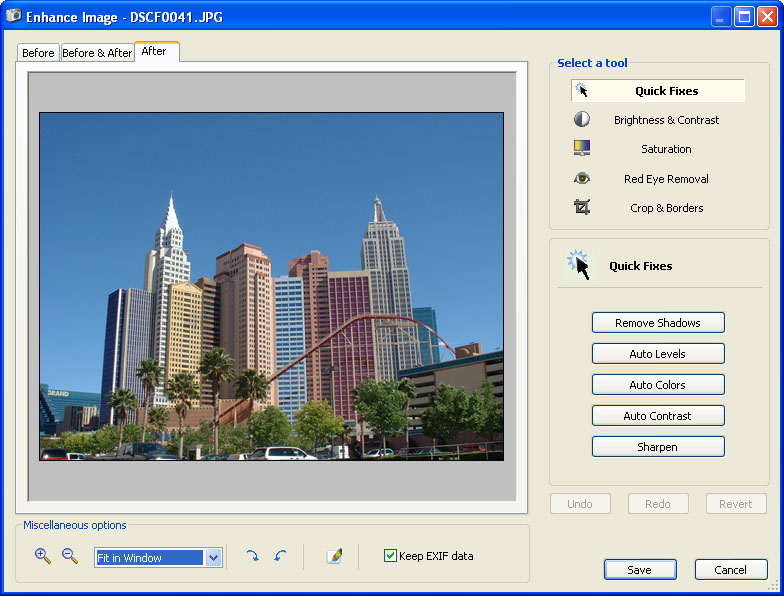
Your picture appears and on the right all the tools available. Quick Fixes include automatic processes that can instantly enhance your image. All the other options are self explaining. Over your picture you can see three tabs that allow you to change which image is displayed (before retouching or after or both at the same time to compare the improvements). You can change the zooming factor using the buttons below the picture and quicly rotate it. The next button allows you to open the image in the first Image Editor you configured.
The quick fixes processes are:
- Auto Levels: tries to compensate for exposure issues
- Auto Color: tries to compensate for color issues for instance when your image has a general blue cast
- Auto Contrast: tries to compensate for contrast issues
- Sharpen: runs a filter called unsharp mask that allows to highlight details in the image without augmenting the noise
Brightness / Contrast and Saturation are real simple: just move the sliders and see the effect on your image
When you switch to Red Eye a selection rectangle appears over the picture. You should move it and adjust the handles to surrender one or several red eyes in the pictures (fixing one eye after the other generally brings better results). Once you have positionned the rectangle properly click the Apply button. If after having changed the zoom factor or having moved the image you do not see the rectangle anymore click the Show Selection button to put it back at the center of the view.
Switching to crop also shows a rectangle that you also have to move around the picture to designate the part of the image you want to keep. If you are cropping your images to print them, you can choose one of the aspect ratios listed to make sure the crop rectangle matches the print aspect ratio.
JPEG images can be losslessly cropped: cam2pc does not have to recompress the JPEG image to crop it. Of course this is possible if the only operation you performed while enhancing your image is a crop. But to perform this, the rectangle must match certain constraints. Check the lossless cropping box to make sure the rectangle satisfies these constraints. In that case the rectangle used to perform the crop might not exactly be the one you designated.