


Renaming Files
You may also want to rename files as they are transferred. Renaming works the same way as Masks do except you have some more switches. If you successfully ran the Configuration Wizard then the renaming should have been automatically setup. Still, you can tweak the settings defined by the Wizard.
The additional switches are ones that will be replaced by the original name and/or extension of the image being transferred. You also have switches that allow you to use EXIF information to rename your files.
Also you can have cam2pc automatically number your images for you. Use the %{num:} switches. The one with the "a" specify that the number should be automatically padded by cam2pc. If you transfer 99 images, cam2pc will number them from 01 to 99, if you transfer 100 images, the numbers will range from 001 to 100. The other version allows you to force the padding length to a desired value. If you want to always have 4 digits whatever the number of images transfer, then use %{num:4}.
If you use numbering, you should leave the "Keep record" to avoid duplicates" enabled especially if you transfer your pictures always to the same directory. In that case cam2pc will record the last number used when it transferred your images. The next time you transfer images to the same directory, cam2pc will use this record to start numbering your images to avoid conflicts. For instance a first transfer could have created files image01.jpg to image04.jpg. The next transfer will automatically start at 5 creating image image05.jpg and following"
If you do not want the numbering to start over with each directory select the "Use a global counter" option. In that case cam2pc will increment the counter for each image wherever it is transferred to. You can change the value assigned to the next transferred image by changing the "Next ID" value. When you do this you should take care to not use an already used number or you may get into filenames conflicts. This option is useful for owners of cameras that are not able to keep the numbering from one session to the other like the Fujifilm S602.
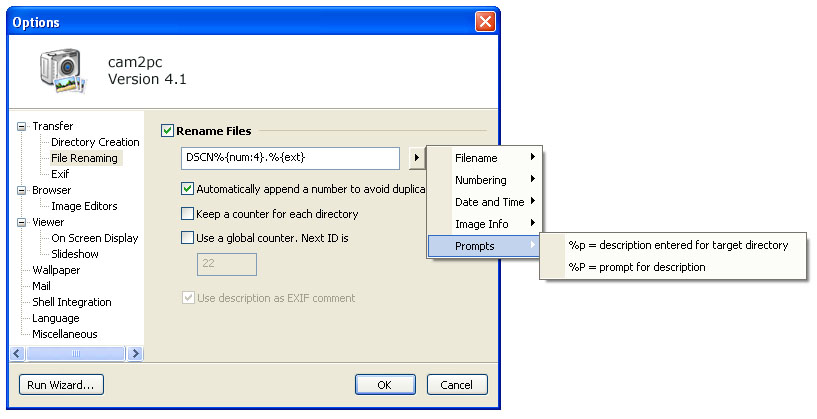
If you use the %P switch, you will be prompted only once for all the images. Entering a description for each individual file could take a long time especially after a 3 week holiday in Europe! If you use the %P switch then cam2pc is also available to use the description entered for each image to fill the EXIF comments. The also available %p switch will use the description you entered for the folder where the image is put. For instance if the image is going to go in the "[2003-04-05] Paris" folder and you used "%p %{num:3}.%e" renaming mask then your files will be renamed "Paris 001.jpg", "Paris 002.jpg" and so on...